Webpack - the missing guide
02 Mar 2017


Webpack - the missing guide
A close look at webpack loaders.
Praise the Load
Loaders make webpack truly powerful, unique and worth your while thanks to their genius simplicity.
This is why I chose to focus on them in this post.
A loader is applied on a single resource and must export a function. for example:
module.exports = function(source) {
  return modifySource(source);
}
You can easily reference your custom loaders with a relative path
require('../my-loaders/my-custom-loader!./some-resource.js')
And you can easily configure your loader.
require('../my-loadersmy-custom-loader?foo=bar!./some-resource.js')
Did you notice it is just like a url query? Do you know any query parsing libraries? :)
It just happens that webpack has a special library for that too
Lets write our own loader
This is the example I’ve shown before
var name = require('console-printer!startcase!./name.txt');
name.print()
Lets write the startcase and console-printer loaders.
Lets assume name.txt contain top 4 worldwide grossing movies in 2016. At the date of writing this, this is the list:
captain america: civil war
zootopia
finding dory
the jungle book
Writing startcase loader
This loader will turn all the names to be with startcase.
So finding dory will become Finding Dory.
var _ = require('lodash')
/**
 * Will turn all names to start case
 * @param source
 * @returns {string} all names in start case
 */
module.exports = function(source){
  return source.split('\n').map(_.startCase).join('\n')
}
This loader is quite simple for now.
I am using lodash to convert all the names to start case.
Writing the console-printer loader
The console-printer loader should output code that exports print method
module.exports = function(source){
  var prints = source.split('\n').map(function(line){
    return `console.log('${line}');`
  }).join('\n');
  return `exports.print = function(){\n${prints}\n}`
}
Lets look at the result
After running webpack --output-filename dist/bundle.js --entry main.js take a look at bundle.js and you should see something like
exports.print = function(){
console.log('Captain America Civil War');
console.log('Zootopia');
console.log('Finding Dory');
console.log('The Jungle Book');
}
Which is the code we generated.
Lets run it
Technically, this code does not require a browser so we could simply node dist/bundle.js to see the prints.
But for the purpose of this post you should run index.html that looks like this:
<html>
    <body>
        <script src="dist/bundle.js"></script>
    </body>
</html>
And open the developers’ area to see the prints.
What does it all mean?
We actually just transpiled the source in names.txt into JavaScript.
This example was pretty simple, but make it complex enough and you get Typescript :)
Lets not stop here.
Like all good transpilers lets add a source map and see how it is done with webpack.
Lets add a source map
To generate a source map we will need to modify the console-printer loader just a bit.
var path = require('path');
var sourceMap = require('source-map');

module.exports = function(source){
  var lines = source.split('\n');
  var prints = lines.map(function(line){
    return `console.log('${line}');`
  }).join('\n');

  // build source map
  var SourceMapGenerator = sourceMap.SourceMapGenerator;

  var relativePath = path.relative(process.cwd(), this.resourcePath);

  var map = new SourceMapGenerator({
    file: this.resourcePath,
    sourceContent: lines
  });
  map.setSourceContent(relativePath,source);
  lines.forEach(function(line, index){
    map.addMapping({
      generated: {
        line: index+2,
        column: 1
      },
      source:relativePath ,
      original: {
        line: index+1,
        column: 1
      }
    });
  });

  this.callback(null, `exports.print = function(){\n\n${prints}\n}`, map.toJSON())
};
Lets walk through the code:
- First require
pathandsource-mapwhich will help us construct the source map. - Afterwards we split the lines by newline and construct the JavaScript code like before.
- Then we generate the source map with a simple logic - each line in
names.txtis now lower by 1. - Eventually we return the result but instead of using
returnwhich only allows returning a single argument, we usethis.callbackwhich allows sending errors, the result and source map.
There are many ways to generate source maps, but webpack has a unique way of its own. When you generate your own source map in webpack it is crucial to pay attention to :
- The paths. Some are relative and some are absolute. Get them wrong and you will not see your content properly.
- You have to attach
sourceas this data is lost after the loader is finished. - You must return an object rather than have a
//# sourceMappingURL=app.js.mapcomment (like you usually do) since webpack uglifies the code and the comment will be lost.
and now lets run webpack again.
This time we need to run webpack with -d flag to generate source map.
webpack -d --progress --colors --output-filename dist/bundle.js --entry ./example-1/main.js
Now you should be able to open the sources tab in developers’ area and fine names.txt there.
You should also be able to put a breakpoint and step over.
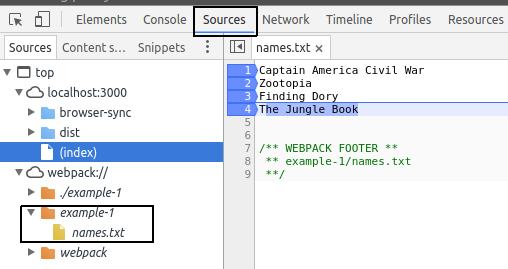
HOW COOL IS THAT?
What else can loaders do?
Here are some things loaders can do:
- Loaders can be async.
- Loaders can get configurations and have access to webpack’s configuration
- Loaders can run in different hooks in webpack’s build process. read about preLoaders.
There’s a guide for writing loaders but I also strongly recommend reading source for existing loaders and reading NormalModuleMixin.js in webpack’s sources.
It helped me clarify some stuff.